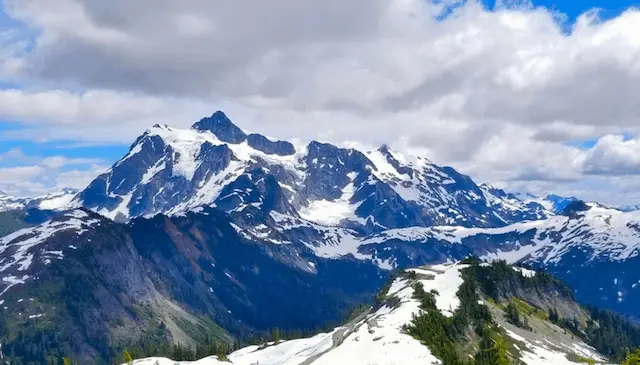
Mount Baker is the tallest mountain in the North Cascade range and one of the most popular climbing spots in the Pacific Northwest. Climbers from around the world travel here to both conquer its challenging heights and take advantage of how easy it is to access ‒ but popularity and accessibility don’t always make for an easy climb.
How hard is it to climb Mount Baker? Mount Baker is relatively easy to climb. While you will need to be physically fit and have some basic climbing knowledge, it is one of the best mountains for beginners to learn the ropes on.
The amount of difficulty you’ll have climbing Mount Baker can be broken up into two different sections:
- Physical fitness
- Climbing knowledge
Physical fitness
The most important trait you can have when climbing Mount Baker is a high base level of physical fitness. All routes to the summit require at least a couple days of steady hiking and arduous climbing. Even the easiest route ‒ the Easton Glacier ‒ involves at least 15 hours of straight physical effort over a two day period.
The most important aspects of physical fitness are cardio and upper body strength.
If you go for long runs or hike trails on a consistent basis, you should be able to handle the exertions required to reach the Mount Baker summit without a problem. But if intense and sustained physical effort isn’t something you’re accustomed to, you run the risk of stranding yourself near the top of the mountain ‒ which can be dangerous for both you and your climbing group.
While getting stranded is always a problem, the primary risk of poor physical condition is suffering from extreme exhaustion in the middle of a steep climb. To ensure your safety and the safety of the other members of your party, you need to be able to consistently make it through the particularly steep sections of the glacier you’re climbing. Some of the climbs on Mount Baker are in excess of 80 degrees, which is pretty difficult for someone in good physical condition to deal with. If you’re not in good physical condition, you could find yourself stuck on a sheet of ice, lacking the strength to either go up or down.
And remember, you’re not doing all of this with just the clothes on your back ‒ all of this hiking and climbing needs to be done while carrying at least 40 lbs. on your back.
If you aren’t in adequate shape for a Mount Baker summit, all is not lost. There are a number of resources you can use to boost your climbing fitness:
- The Outdoor Athlete by Doug and Courtenay Schurman
- Training for the New Alpinism: A Manual for the Climber as Athlete – by Steve House and Scott Johnson
- Conditioning for Outdoor Fitness – by Davd Musnick, M.D. and Mark Pierce, A.T.C.
In addition to those written resources, you can also employ the following training techniques to prepare your body for the rigors of climbing the tallest mountain in the North Cascades.
- Pack-loaded uphill walking, hiking, and stair climbing
- Strength training for the lower and upper body
- Cardio training
- Stretching
If you are planning on summiting Mount Baker, you should give yourself at least 6 months of training to prepare for it. Mountaineering is an extremely taxing activity, and adding ice climbing and glacial travel to the mix only makes it harder.
There are other things to do around Mount Baker be sure to check out our things to do at Mount Baker article.
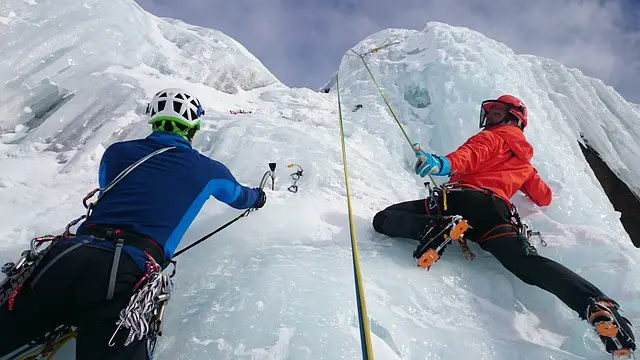
Climbing knowledge
After getting physically fit, the most difficult part of preparing for Mount Baker is gaining the necessary climbing knowledge. If you’re going on a guided climb ‒ which every beginner should absolutely be doing ‒ preparing your climbing knowledge ahead of time really isn’t necessary. Every guided climb will devote at least one day to learning basic climbing skills and equipment use.
That being said, it doesn’t hurt to familiarize yourself with the intricacies of ice climbing before heading to the Mount Baker area. Here are a few of the key techniques you’ll need to successfully summit Mount Baker.
This article is owned by Recapture Nature and was first published on August 17, 2019
Crampon use
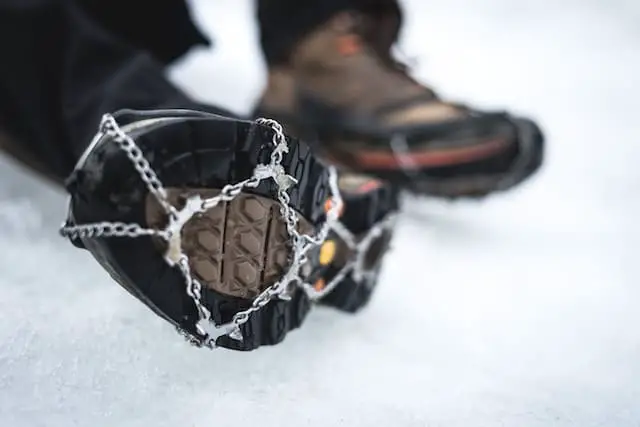
The first thing you’ll need to know to successfully scale a glacier is how to use crampons. There are three primary techniques used by professional climbers: the French technique, the German technique, and the Combined technique.
The French technique is used for low-angle to somewhat steep ice, typically maxing out at 40 degrees. With the exception of the front piece, you should keep every crampon point in contact with the ice at all times. This will improve your traction and make it extremely unlikely that you slip and fall.
The German technique is used on steeper slopes ‒ typically 45 degrees and up. It’s basically the opposite of the French technique, in that you only keep your front crampon in contact with the ice. Although it’s used on more challenging slopes, the German technique is actually easier to master than the French technique ‒ you simply kick your foot into the ice and stand.
The combined technique mixes both of the other techniques. It’s mainly used for moderately steep ice in the 40 to 45 degree range.
Ice axe use
After dealing with the crampons, you should move on to the ice axe. These also have corresponding French and German techniques, and the one you use is also dependent on the steepness of the slope you’re climbing.
This article is owned by Recapture Nature and was first published on August 17, 2019
Just like with the crampons, the French technique should be used on low to moderate slopes ‒ 45 degrees is typically the max. There are two positions used in the French technique: cane and cross-body.
The cane position is needed when you’re walking on flat to low-angle terrain. You grip the axe by the head, and the spike at the bottom end of the shaft connects with the ice.
The cross-body position is used when the slope angle rises and you need to climb in a diagonal fashion. You grasp the axe by the head and plant the bottom spike into the slope on the other side of your body.
The German technique is used for slopes of 45 degrees or more. There are four positions used in the German technique: low dagger, high dagger, anchor, and traction.
The low dagger position is used to stabilize yourself when you’re front-facing the ice. You stick the pick into the ice at waist or chest level and steady yourself before continuing.
The high dagger position is also used for stabilization. It’s basically the low dagger position, but you’re placing the pick above your head instead of at waist or chest height.
The anchor position is used to anchor yourself with even more security than the dagger positions. You hold the bottom of your axe, swing it into the ice above your head, and move your hands up the axe handle as you simultaneously move your feet up.
The traction position is used for extremely steep slopes. You’ll need two axes for this, as one will be holding you in place while you swing the other. When using the traction position, hold each pick near the bottom of the shaft. Swing one above your head and lodge it firmly in the ice. Do the same with the other, and then move your feet up. Repeat this process until you come to a less steep section.
Using ice screws
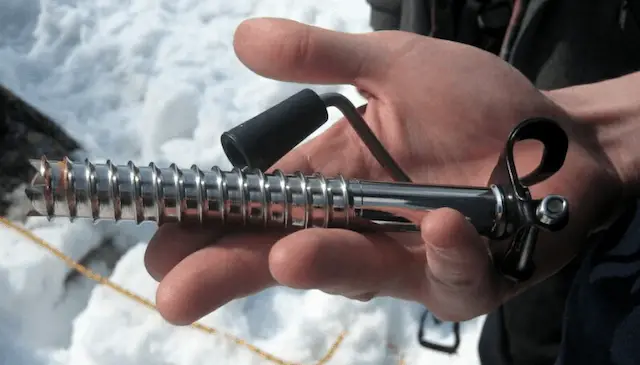
The last major skill an ice climber needs to learn is the use of ice screws. These will anchor you in place and save you if you slip and fall. They will also let you belay your partner and rappel down after finishing a climb.
Ice screws are simple enough to understand, but can be surprisingly hard to master. Here’s the basic process:
This article is owned by Recapture Nature and was first published on August 17, 2019
- Find an adequate spot to place the screw. This will typically be near your waist, as it is much easier to twist it in there instead of trying to screw it in above your head.
- Clear away snow and soft ice until you reach the solid, hard ice underneath.
- Use your pick to chisel out a small hole in which you can place the screw.
- Push and turn the screw until it’s firmly in place. If any ice fragments fracture while doing so, clear them away.
- Clip the screw to the rope with a quickdraw.
Note: These tips aren’t meant to replace actual climbing experience. They are included to give you some idea of the difficulty of the tasks you’ll have to perform in order to successfully climb Mount Baker.