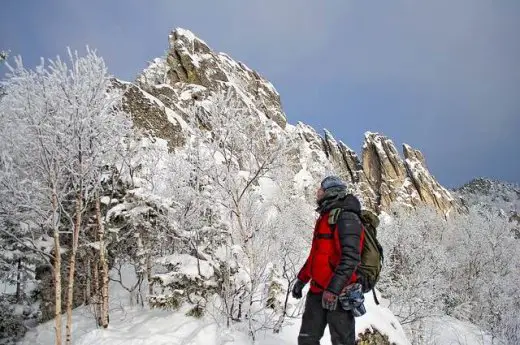
Camping in the winter is not for the light-hearted. It can be a tough experience that will test your mettle and prove to you what you are capable of.
While likely to make you uncomfortable at times, winter camping can be very rewarding. There’s nothing quite like the expansive view from the peak of a snow-covered mountain. Camping in the winter will help you channel your inner warrior, and your confidence will soar as you survive harsh conditions.
When camping in the harsh elements of winter, it is important to be prepared with the right gear and the knowledge required to use it well. Hypothermia is no joke. You could wind up dead if you’re not properly prepared.
This article is going to cover everything you need to find the right winter camping gear and set it up properly. You’ll be ready for a snowy winter expedition in no time!
How to Stay Warm While Winter Camping

We’ve come up with nine different things to consider when you are winter camping. If you get all of these nailed down, you’re sure to stay warm and have a great time on your cold-weather camping trip. They are:
- Choosing the right tent
- Choosing the right sleeping pad to keep you warm
- Getting a good sleeping bag
- Insulating the sides and roof of your tent
- Insulating the floor of your tent
- Staying out of the wind
- Wearing proper cold weather clothing
- Using the hot water bottle trick
- Using the hot stone trick
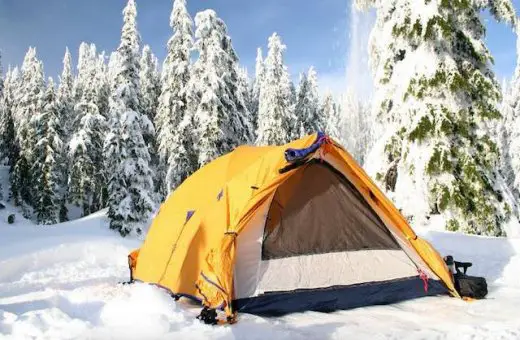
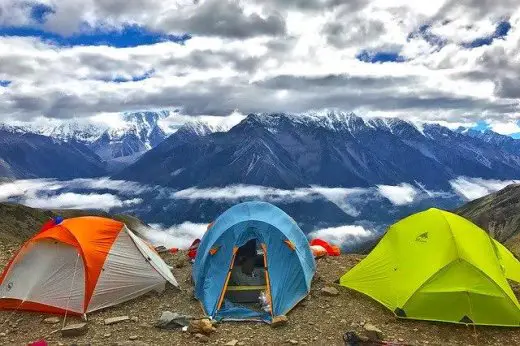
What Kind of Tent Should You Bring?
Choosing the right tent is important when you will be camping during the winter. Buying an expensive four-season tent is less important than you think. Any tent that meets a few basic requirements will work, especially if you are willing to add a little extra insulation yourself.
A Well Sealed Tent is Important
It is most important that your tent be sealed so that it keeps warm air in and the wind out. Tents that are designed to let a breeze through during the summer will not do.
A good winter tent will be designed very well to trap heat and protect against strong winds. If you do not wish to spend a lot of money on an expensive four-season tent or an expedition tent, there are cheaper options.
Your basic three-season or even two-season tent that you already have can be a viable option for winter weather if you are willing to add an extra rainfly and insulation to the floor.
Smaller is Better
Your body heat (and other heat sources if you bring them) are what will be keeping your tent warm at night. That’s why it is so important for your tent to have no leaks.
A larger tent will have more air that needs to be warmed whereas a small tent has less. It’s really nice to have the extra space to move around that a larger tent will offer, but is it worth being cold all night? Think carefully about how much space you actually need and plan accordingly.
3-Season vs. 4-Season vs. Expedition Tent
3-Season Tent
This is your most common and versatile type of tent. 3-season tents are designed to withstand heavy rain and rough weather conditions and are also well ventilated to stay cool in the summer.
You can get away with a 3-season tent in mild winter conditions if the rest of your gear is up to par. If you are going to be camping in the snow or extreme cold, you can still get away with a 3-season tent, but you will need to add some insulation or an extra rain fly if you want to be comfortable.
3-season tents are made with ventilation that will keep them cool in warm weather. This is great during the summer but will be cold during the winter months.
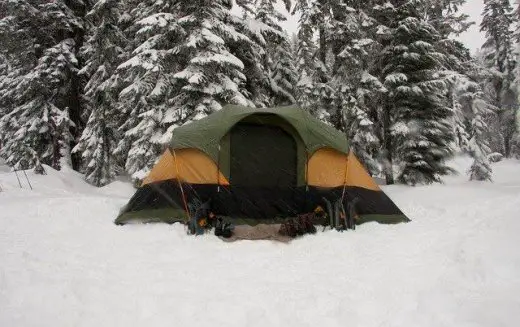
4-Season Tent
These tents are designed specifically for the winter months. It’s called a 4-season tent, but a 4th-season tent may be a more accurate description. These tents are made specifically for winter camping and will be too hot during the summer or late spring.
You may want to consider a 4-season tent if you are a casual ice climber or you plan to be hunting in the snow. A 4-season tent is designed to withstand harsh winter conditions. They are made to be used in snowstorms and will hold up to extreme winds.
4-season tents are designed to stay extra warm by doubling up tent layers or even adding special insulation to the walls. These tents are considerably more expensive than 3-season tents, but they are well worth it if you plan to be spending a lot of camping in the cold.
Expedition Tent
Expedition tents, also known as 5-season tents, are top of the line winter camping gear. This is what the pros use. They are designed to hold up to the most extreme winter conditions, such as severe storms and heavy snowfall.
Their design will include very strong tent poles to hold up the weight of snow and thick double-layered walls to keep you as warm as possible. These tents are very expensive and are a viable option only for professional outdoorsmen or very serious campers.
The Right Sleeping Pad to Keep you Warm
The ground is going to be very cold when you are camping in the winter. It will be almost impossible to stay warm if you are sleeping directly on the earth without any sort of barrier to create some insulation.
There are other options to insulate the ground in your tent, but the best and most obvious is to get a good sleeping pad. The right sleeping pad will not only keep you warm but make you much more comfortable during the night. Not all sleeping pads are appropriate for winter camping, though.
The most important thing you should consider when purchasing your winter sleeping pad is its R-value.
The R-value is the measurement of how well a type of insulation works. The higher the R-value is, the less heat will seep through it. There are many different types of sleeping pads, but the R-value will always tell you which is warmer.
During the winter, an R-value of five or greater is recommended. You could get away with an R-value of four, but I wouldn’t recommend going any lower than that. It should also be mentioned that R-values add up, so if you already have an R-value of three, you could buy a cheaper pad with an R-value of two and stack them.
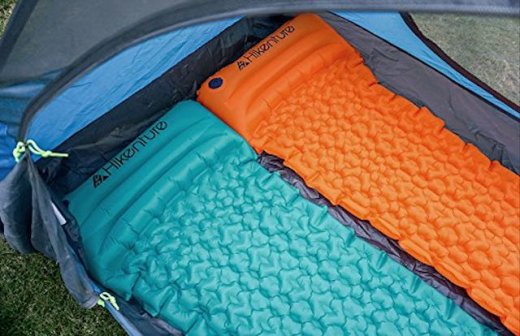
You are generally going to want to avoid inflatable sleeping pads or air mattresses when camping in the winter. Air is not a very good insulator, so these sleeping pads will leave you freezing.
The exception to this rule is the self-inflating sleeping pad, which is an inflatable pad with open-cell foam integrated into it. This style of pad is great because it offers extra comfort and warmth while still being compact and easy to pack.
Closed-cell sleeping pads are another kind, and they are said to be the most insulating. The downside of closed-cell sleeping pads is that they are bulky and hard to pack. That’s the trade-off you have to make for better insulation.
Ultimately though, it is the R-value that is most important, and you can find similar R-value pads that will pack much lighter. These pads also tend to be more expensive, though.
Get a Good Sleeping Bag
Your sleeping bag is going to be your greatest source of heat retention during a cold winter’s night.
A very experienced outdoorsman can make himself comfortable with just a sleeping bag. He’ll build a shelter out of whatever is available; wood, leaves, or even snow.
Choosing the right sleeping bag for your camping trip is easy, just look at the temperature rating on the label. There will be a comfort rating and a limit rating.
- The comfort rating is the temperature that you will be able to sleep comfortably and warmly through the night.
- The limit rating is the temperature where your sleeping bag will keep you alive through the night, but you’re not going to be comfortable, and you might not even sleep.
There are some other features you may want to think about when purchasing a sleeping bag, such as packability, shape, and the material it is made out of.
Most low-temperature sleeping bags are large and take up a lot of space. They need to be this way because it is the bulkiness of the sleeping bag that makes it so warm.
There is a way to make your large sleeping bag more compact, though. They make compression sacks that allow you to squish your sleeping bag into as small a space that it will fit. You can also do this on the cheap by using cinching straps.
Sleeping bags come in two general shapes. There is the mummy bag shape and the rectangular sleeping bag shape.
Mummy bags
Mummy bags are generally better for cold weather camping. They come with a hood built in to keep your head warm during the night, and they are also designed with less space inside to maximize the amount of heat that is contained within the bag.
Rectangular bags
Rectangular bags are good too, but they often do not have a hood and are more spacious, which will not be as efficient at keeping heat trapped inside. The rectangular-shaped sleeping bags are often cheaper than the mummy bags, and having more space can be nice.
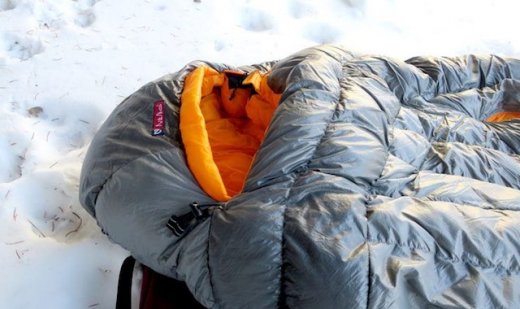
The last thing to consider is the material your sleeping bag is made of. The two general types are down and synthetic.
Down
Down is the soft fuzz that you see on cute little baby ducks and geese. Adult ducks and geese also have down underneath their feathers.
Down is a high-quality material that is excellent for trapping heat. It’s very durable and compressible, which makes it such a good choice for sleeping bag materials. Even large down sleeping bags can be compressed to fit in your pack.
The downsides of down sleeping bags are that they are considerably more expensive than synthetic, and they do not perform well when wet. When you get a down sleeping bag wet, it loses almost all of its insulation capabilities. Hopefully, your sleeping bag won’t be getting wet, but in the case of an emergency, down might not be a good option.
Synthetic
Synthetic bags, on the other hand, make up for the downsides of the down bag. They are made of polyester which is cheaper than down and stands up to water much better.
Let’s say you fall in the river during the hike to your campsite. A synthetic bag will dry out much better than down and will still keep you warm throughout the night even though it is wet. You might not be comfortable, but you’re going to survive. On the flip side, falling in the river with a down sleeping bag could be fatal.
The downside of the polyester sleeping bags is that they don’t pack nearly as well. This can be a pain because who wants to carry around a huge sleeping bag?
One last note about optimizing your sleeping bag setup: there are ways that you can boost the warming power of your bag.
The most straightforward way would be to bring a blanket along. There are also products made specifically to improve your sleeping bags such as sleeping bag liners and bivies. The right bivy will even make your sleeping bag waterproof. The minimalist outdoorsman might be able to get by without a tent by bringing a tarp and bivy instead.
Insulating the Sides and Roof of your Tent
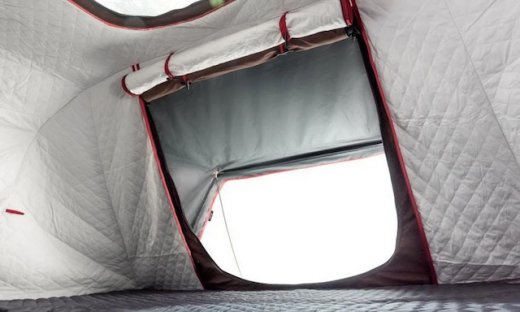
This step is not necessary if you’ve got yourself a 4-season or expedition tent. It still might be helpful if you’re in really cold conditions, though.
If you’re only working with a 3-season or 2-season tent, you’re definitely going to want to add an extra layer of insulation for below-freezing conditions.
The simplest way to do this is to bring an extra tarp or rain fly. After setting your tent up, drape the tarp over the tent, so it’s as even as possible on all sides. Then stake the outer tarp down to the ground as tightly as you can. You want to stake it tightly so that it is difficult for air to pass through.
This is an important step to make your 3-season tent ready to handle really cold conditions. It not only adds an extra layer to trap heat, but it will also block off the ventilation that is built into the tent for hot summer weather. This will keep cold air and strong wind from cooling down your tent.
Some people also use safety blankets or mylar tarps to cover their tents and trap in extra heat. Both of these types of covers have a shiny foil layer that reflects back ambient heat trapping it into your tent.
The problem with these methods, however, is that they can also block heat from entering your tent during the day by reflecting the sunlight away.
If you’re going to go this route, look for a tarp that has reflective material on only one side and ideally a dark color on the other. Put the reflective side facing your tent and the non-reflective side on the outside so that it can still absorb heat from the sun.
You can also wait until the sun is almost down to put this layer onto your tent. That way, your tent will absorb the heat during the day and then trap the heat inside at night.
Insulating the Floor of your Tent
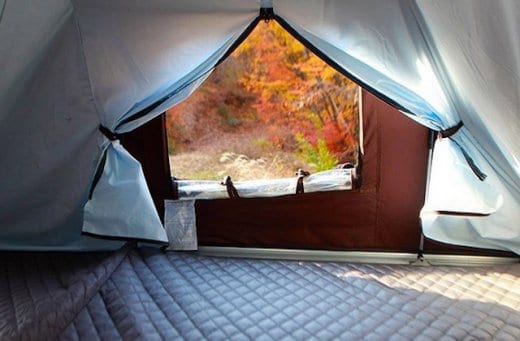
You should already have your sleeping mat which will provide enough insulation from the ground for you to sleep. If you want to go the extra mile and have a tent that is a little warmer and nicer to spend time in, you can insulate the rest of the floor as well.
Like I already mentioned, the cold ground will sap a lot of heat from your tent. Insulating the rest of the floor will dampen this effect. There are a lot of ways you can go about insulating your floor. Feel free to get creative. You can bring an extra pad or yoga mat to cover some floor area. A blanket or a rug will also work.
You can even use your backpack to cover part of the floor and then spread your clothes and gear around the tent to cover more area. You’re probably getting the picture by now, anything that covers the floor can be insulation.
Staying Out of the Wind
It is very important to reduce your wind exposure during cold winter conditions. Strong wind can make even semi-warm conditions extremely cold. The wind also saps moisture from the body, which will make you go through your water supply faster. Water is heavy, so you want to have to carry as little as possible.
Staying out of the wind is not too hard to do. There are plenty of natural barriers and windbreaks all around. You can camp in the trees or hide out behind large rocks.
When you are camping in an area with no wind barriers, you can even build some yourself.
If there is a lot of snow around, you can use it to your advantage. Snow is easy to work with and makes a great wind barrier. You can dig a hole in the snow to place the footprint of your tent.
This gives you a few feet of wind protection on the bottom of your tent, where the wind is most likely to blow in. You can also pile the snow up and build a wall around your tent that will protect it from the wind.
If there are no good options to block the wind around your campsite, you can always use an extra tarp or two to insulate your tent, as described above. This will give your tent better protection from the wind.
Proper Cold Weather Clothing
You are going to need to be prepared with the proper clothing to make it through your winter camping trip.
You want to have the right clothes during the day and also something to sleep in at night to keep you warm. Wearing layered clothes is the best.
Layering gives you the most heat retention possible while also taking the least space in your pack. You can shed layers as you need to when you get too warm and then put them back on as you get cold.
Winter camping clothes come in three layers; base layer, middle layer, and outer layer.
Base Layer
This layer is going to consist of thermal long john underwear and a lightweight thermal long sleeve shirt.
This is the layer that you wear while you sleep at night. They make base layers for different conditions, some being much warmer than others. Choose wisely because some thermals will have you sweating unless it’s very cold outside.
Middle Layer
The middle layer will be warmer than your base layer. This will be your fleeces, sweatshirts, and puffy jackets. The basic function of this layer is to retain body heat by adding insulation.
This article is owned by Recapture Nature and was first published on February 13, 2020
This layer is usually not wind or waterproof, and you might end up taking it off when hiking makes you too hot.
Outer Layer
The outer layer is what protects you from the elements. The most important aspects of this layer are that it will be waterproof and windproof. The outer layer will consist of a rain jacket, windbreaker or heavy weatherproof, coat, and snow pants or rain pants.
When putting together your winter camping wardrobe, you want to make sure that your setup is waterproof and windproof but also breathable.
Breathability is very important because you will put off a lot of moisture when you sweat. If your clothes trap this moisture inside, you will become wet and very cold. Wool and polyester are good breathable materials for your middle layer and base layer.
For the outer layer, different synthetic material technologies are both waterproof and breathable. Make sure you look for this while you are shopping for this layer.
This article is owned by Recapture Nature and was first published on February 13, 2020
Besides your base, middle, and outer layer clothes, I would also recommend getting a really warm hat to protect your head and some thermal socks as well.
The Hot Water Bottle Trick
This is an old trick that campers have used for a long time to stay nice and cozy all night long.
The trick is to boil some water right before bed and pour it into an extra water bottle that you have brought along. They even make special flexible, easy to pack bottles for this very purpose.
You put the water bottle of boiling water at the bottom of your sleeping bag. Your sleeping acts as an insulator, so it will retain the heat from the boiling water all night. Combine this with your body heat, and your sleeping bag is going to be quite cozy.
You can boil your water using a portable camp stove or a fire. You will need to bring a pot with you for boiling, or you can also get creative and use something like a tin can if you have brought canned food with you.
The Hot Stone Trick

This is an easy trick to add some extra heat to your tent at night. This is also how traditional Native American sweat lodges are heated. You’ll be able to get your tent pretty toasty if you want to.
To do this trick, you build a fire and place some large stones around the fire. The bigger the stone, the more heat it will hold. You also want to make sure the stones aren’t too heavy because you are going to have to handle them, and they are going to be hot.
As you sit by the fire you let the stones sit and absorb the heat. When you are ready to head into your tent, you take the hot stones away from the fire and bring them inside. The heat will radiate throughout the night and get trapped inside your tent.
Be careful that the stones aren’t too hot. You don’t want to burn yourself or melt a hole in your tent. Getting the stones just a little too hot to handle and then using a towel to bring them in is ideal.
Summary
There is a lot that goes into staying warm during the winter and many elements to consider. We have gone over the most important things you need to know to stay alive and comfortable in cold camping conditions.
This article is owned by Recapture Nature and was first published on February 13, 2020
If you have taken everything in the article into consideration and planned accordingly, you will be set up for success. All that’s left is to get out into the cold and have some fun!
Additional Resources
- Gudgear: How to Insulate a Tent for Winter Camping
- Camping With Style: The Secret to Happy Camping How to Stay Warm in your Tent
- Camping Hiking Necessities: 13 Tested Tips for Insulating a Tent for Winter Camping
- REI: Winter Camping Basics
- Camping Habits: The Difference Between 1,2,3,4 and 5 Season Tents
- Camping Habits: 5 Ways to Insulate a Tent for Cold Seasons
- REI: How to Choose Sleeping Bags for Backpacking
- Gear Junkie: Down Vs. Synthetic How to Choose Sleeping Bag Insulation
- Endwild: What is a Sleeping Pads R-Value
- Section Hiker: Sleeping Pad R Values
- REI: Layering Basics